Mutual TLS (mTLS) is required for more strict networks, such as production or Zero-Trust networks deployment. This entry aims at documenting how that can be achieved using Keycloak.
The following indications give insight on two ways to configure Keycloak (tested in 23.0.6) to work in an mTLS setup:
- Whether you want to authenticate end-users, prompting to prove their identity through their X509 certificate.
- If you want to use clients (e.g. software services) that identify themselves against your service.
Direct deployment
For a pre-configured example, head over to this repository and select the “direct” deployment mode. It contains a one-click deployment that loads some pregenerated configuration. It also provides scripts to programmatically generate all required resources and to test the token retrieval.
The certificate generation script will append an entry to your `/etc/hosts` file. Run specific commands manually if you wish to not automate this step.
Manual configuration
Below follows the explanation for the manual configuration of Keycloak. This is specially useful when in need of some tailoring and adaptation to your needs.
X509 certificate generation
For both methods, or ways to configure, the first step is to generate the certificates to be used. You may use the following script – note that if you change any value, you will need to perform the pertinent adaptations in the upcoming steps.
This will first generate the certificate for the CA, then the one for the Keycloak server and finally the one to be used by the user (or client).
1
2
3
4
5
6
7
8
9
10
11
12
13
14
15
16
17
18
19
20
21
22
23
24
25
26
27
28
29
30
31
32
33
34
35
36
37
38
39
40
41
42
43
44
45
46
47
48
49
50
51
52
53
54
55
56
57
58
59
60
61
62
63
64
65
66
67
68
69
70
71
72
73
74
75
76
77
78
79
80
81
82
83
84
85
# Variables
CA_NAME="ca"
CLIENT_NAME="client"
SERVER_NAME="server"
CERT_DN_C="CT"
CERT_DN_ST="State"
CERT_DN_L="City"
CERT_DN_O="Company"
CERT_DN_OU="Department"
CERT_DN_BASE=$(echo "${CERT_DN_OU}.${CERT_DN_O}.${CERT_DN_C}" | tr '[:upper:]' '[:lower:]')
CERT_DN_EXT_CA="${CA_NAME}"
CERT_DN_CN_CA="${CERT_DN_EXT_CA}.${CERT_DN_BASE}"
CERT_DN_MAIL_CA="${CERT_DN_EXT_CA}@${CERT_DN_BASE}"
CERT_DN_EXT_SERVER="${SERVER_NAME}"
CERT_DN_CN_SERVER="${CERT_DN_EXT_SERVER}.${CERT_DN_BASE}"
CERT_DN_MAIL_SERVER="${CERT_DN_EXT_SERVER}@${CERT_DN_BASE}"
CERT_DN_EXT_CLIENT="${CLIENT_NAME}.${SERVER_NAME}"
CERT_DN_CN_CLIENT="${CERT_DN_EXT_CLIENT}.${CERT_DN_BASE}"
CERT_DN_MAIL_CLIENT="${CERT_DN_EXT_CLIENT}@${CERT_DN_BASE}"
KEYSTORE_PASSWORD="changeit"

# Root CA
cat > "${CA_NAME}.v3.ext" << EOF
[req]
default_bits = 4096
encrypt_key  = no # Change to encrypt the private key using des3 or similar
default_md   = sha256
prompt       = no
utf8         = yes
# Specify the DN here so we aren't prompted (along with prompt = no above).
distinguished_name = req_distinguished_name
# Extensions for SAN IP and SAN DNS
req_extensions = v3_req
# Be sure to update the subject to match your organization.
[req_distinguished_name]
C  = ${CERT_DN_C}
ST = ${CERT_DN_ST}
L  = ${CERT_DN_L}
O  = ${CERT_DN_O}
OU = ${CERT_DN_OU}
CN = ${CERT_DN_CN_CA}
emailAddress = ${CERT_DN_MAIL_CA}
# Allow client and server auth. You may want to only allow server auth.
# Link to SAN names.
[v3_req]
authorityKeyIdentifier = keyid,issuer
basicConstraints       = critical, CA:TRUE
nsCertType             = client, email
subjectKeyIdentifier   = hash
keyUsage               = critical, keyCertSign, digitalSignature, keyEncipherment
extendedKeyUsage       = clientAuth, serverAuth
EOF
if [[ ! -f ${CA_NAME}.crt ]]; then
  openssl req -x509 -sha256 -days 3650 -newkey rsa:4096 -keyout ${CA_NAME}.key -nodes -out ${CA_NAME}.crt -subj "/C=${CERT_DN_C}/ST=${CERT_DN_ST}/L=${CERT_DN_L}/O=${CERT_DN_O}/OU=${CERT_DN_OU}/CN=${CERT_DN_CN_CA}/emailAddress=${CERT_DN_MAIL_CA}" -extensions v3_req -config ${CA_NAME}.v3.ext
fi

# Keycloak server certificate
openssl req -new -newkey rsa:4096 -keyout ${SERVER_NAME}.key -out ${SERVER_NAME}.csr -nodes -subj "/C=${CERT_DN_C}/ST=${CERT_DN_ST}/L=${CERT_DN_L}/O=${CERT_DN_O}/OU=${CERT_DN_OU}/CN=${CERT_DN_CN_SERVER}/emailAddress=${CERT_DN_MAIL_SERVER}"
cat > "${SERVER_NAME}.v3.ext" << EOF
authorityKeyIdentifier=keyid,issuer
basicConstraints=CA:FALSE
keyUsage = digitalSignature, nonRepudiation, keyEncipherment, dataEncipherment
EOF
openssl x509 -req -CA ${CA_NAME}.crt -CAkey ${CA_NAME}.key -in ${SERVER_NAME}.csr -out ${SERVER_NAME}.crt -days 365 -CAcreateserial -extfile ${SERVER_NAME}.v3.ext

# Client certificate
openssl req -new -newkey rsa:4096 -nodes -keyout ${CLIENT_NAME}.key -out ${CLIENT_NAME}.csr -subj "/C=${CERT_DN_C}/ST=${CERT_DN_ST}/L=${CERT_DN_L}/O=${CERT_DN_O}/OU=${CERT_DN_OU}/CN=${CERT_DN_CN_CLIENT}/emailAddress=${CERT_DN_MAIL_CLIENT}"
cat > "${CLIENT_NAME}.v3.ext" << EOF
authorityKeyIdentifier=keyid,issuer
nsCertType = client, email
subjectKeyIdentifier = hash
basicConstraints=CA:FALSE
keyUsage = critical, digitalSignature, nonRepudiation, keyEncipherment
extendedKeyUsage = clientAuth, emailProtection
EOF
openssl x509 -req -CA ${CA_NAME}.crt -CAkey ${CA_NAME}.key -in ${CLIENT_NAME}.csr -out ${CLIENT_NAME}.crt -days 365 -CAcreateserial -extfile ${CLIENT_NAME}.v3.ext

# Export certificates and private keys to a p12 file to import them more easily
cat ${CLIENT_NAME}.crt ${CLIENT_NAME}.key > ${CLIENT_NAME}.pem
openssl pkcs12 -password pass:"" -export -in ${CLIENT_NAME}.pem -inkey ${CLIENT_NAME}.key -out ${CLIENT_NAME}.p12 -name "${CLIENT_NAME}"
cat ${CA_NAME}.crt ${CA_NAME}.key > ${CA_NAME}.pem

# Verify certificates (no "-x509_strict" added since these seem to miss extensions from its generation)
openssl verify -verbose -x509_strict -CAfile ${CA_NAME}.crt -CApath . ${SERVER_NAME}.crt
openssl verify -verbose -x509_strict -CAfile ${CA_NAME}.crt -CApath . ${CLIENT_NAME}.crt
Also, note that some of these certificates and keys shall be imported to the trustore and keystore files that Keycloak will be using.
1
2
3
4
5
6
7
8
# Keystore and trustore required by Keycloak
[[ $(dpkg -l | grep ca-certificates | wc -l) -eq 0 ]] && sudo apt install -y ca-certificates
# Create PKCS#12 servidor and client
openssl pkcs12 -export -name server-cert -in "$CA_NAME.crt" -inkey "$CA_NAME.key" -out "${SERVER_NAME}".keystore -passout pass:"$KEYSTORE_PASSWORD"
openssl pkcs12 -export -name "$CLIENT_NAME" -in "$CLIENT_NAME.crt" -inkey "$CLIENT_NAME.key" -out "$CLIENT_NAME.p12" -password pass:""
# Import client and CA certificates in truststore
keytool -import -alias client-cert -file "$CLIENT_NAME.crt" -keystore "${SERVER_NAME}".truststore -storepass "$KEYSTORE_PASSWORD" -noprompt
keytool -import -alias ca-cert -file "$CA_NAME.crt" -keystore "${SERVER_NAME}".truststore -storepass "$KEYSTORE_PASSWORD" -noprompt
Besides this, for Keycloak to work in production you will need to add the CN of the X509 certificate used by the Keycloak server in your /etc/hosts file and map it to the IP you run the server on (here, localhost).
1
2
3
4
5
6
# Generate entry at /etc/hosts with the server FQDN, as required by Keycloak in production mode
cat <<EOF | sudo tee -a /etc/hosts

# Local Keycloak (production mode)
127.0.0.1       ${CERT_DN_CN_SERVER}
EOF
Then, create a new realm, e.g. named “x509”; which is configured to request SSL connections to any request.
Method 1: X509-based end-user authentication
Duplicate the “browser” authentication flow and name it as “x509 browser”.
As explained in this video, remove the steps named “Kerberos”, “Identity provider Redirector” and “X509 Browser Browser - Conditional OTP”; then add a new execution flow named “X509/Validate Username Form” and move it right after the “Cookie” step. The result should be as follows.

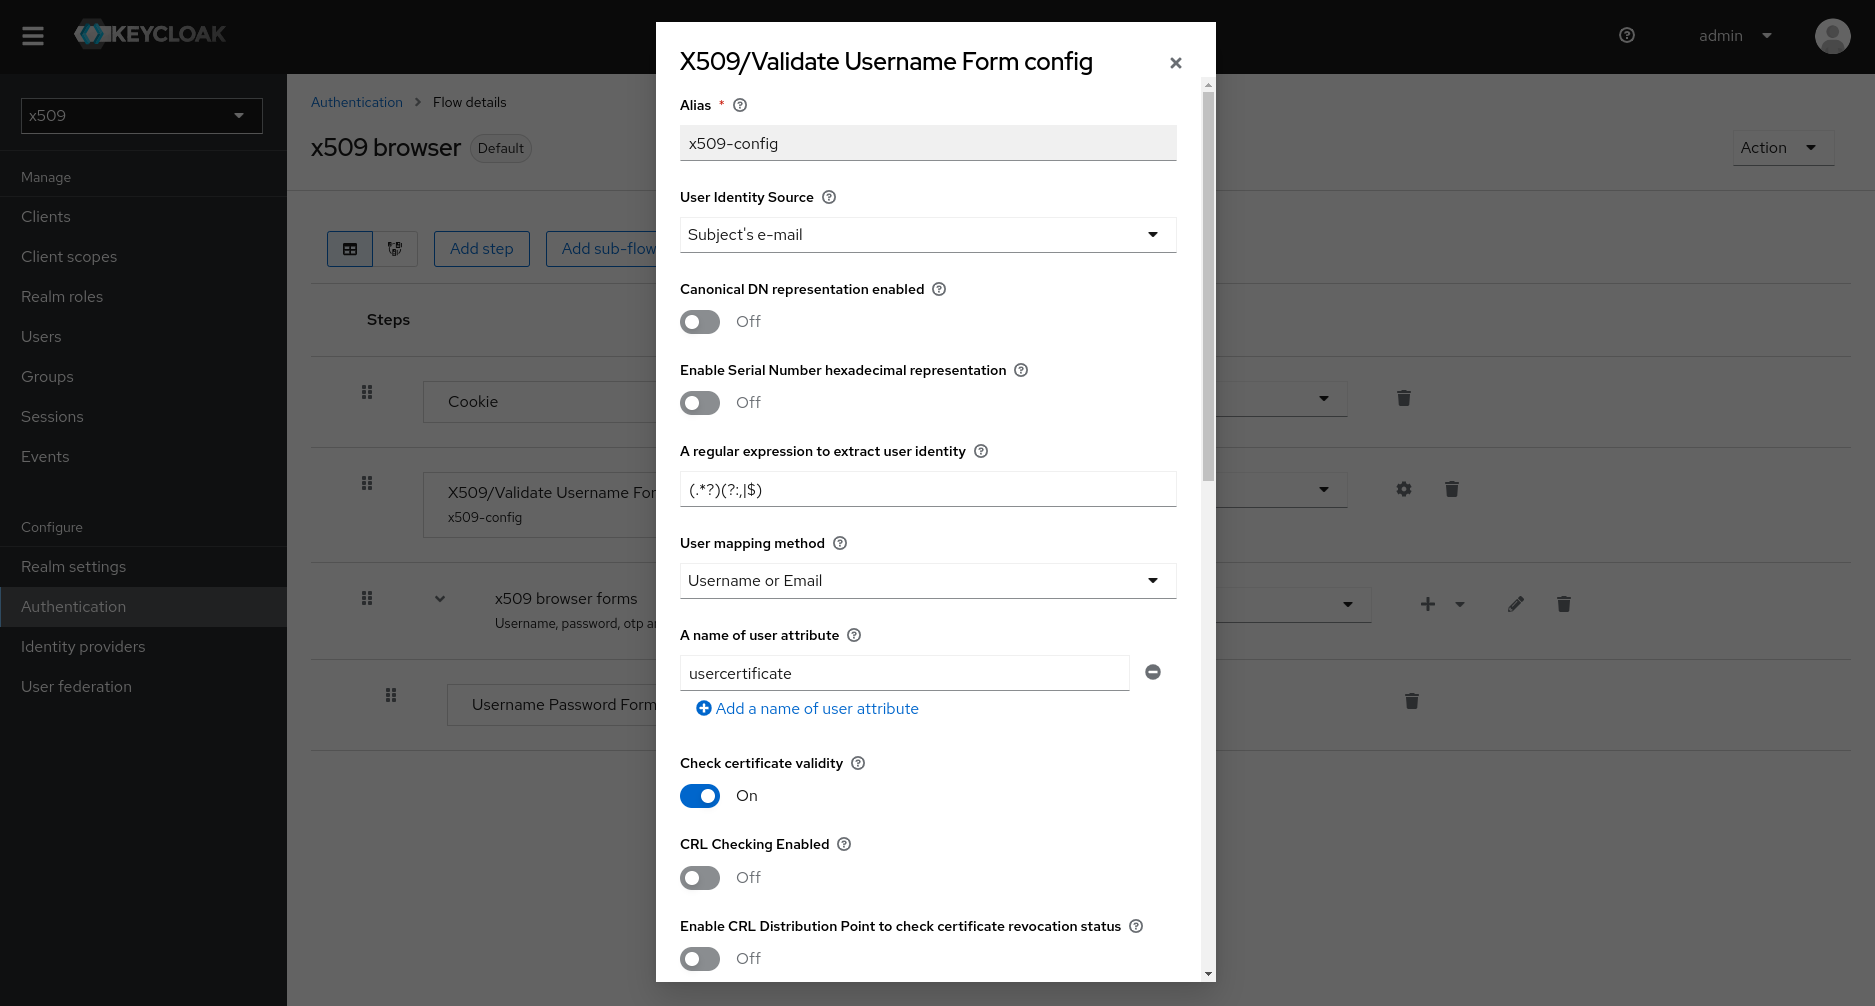
Then, configure this last step (“X509/Validate Username Form”) as follows:
| Property | Value |
|---|---|
| Alias | x509-config |
| User Identity Source | Subject’s e-mail |
| User mapping method | Username or Email |
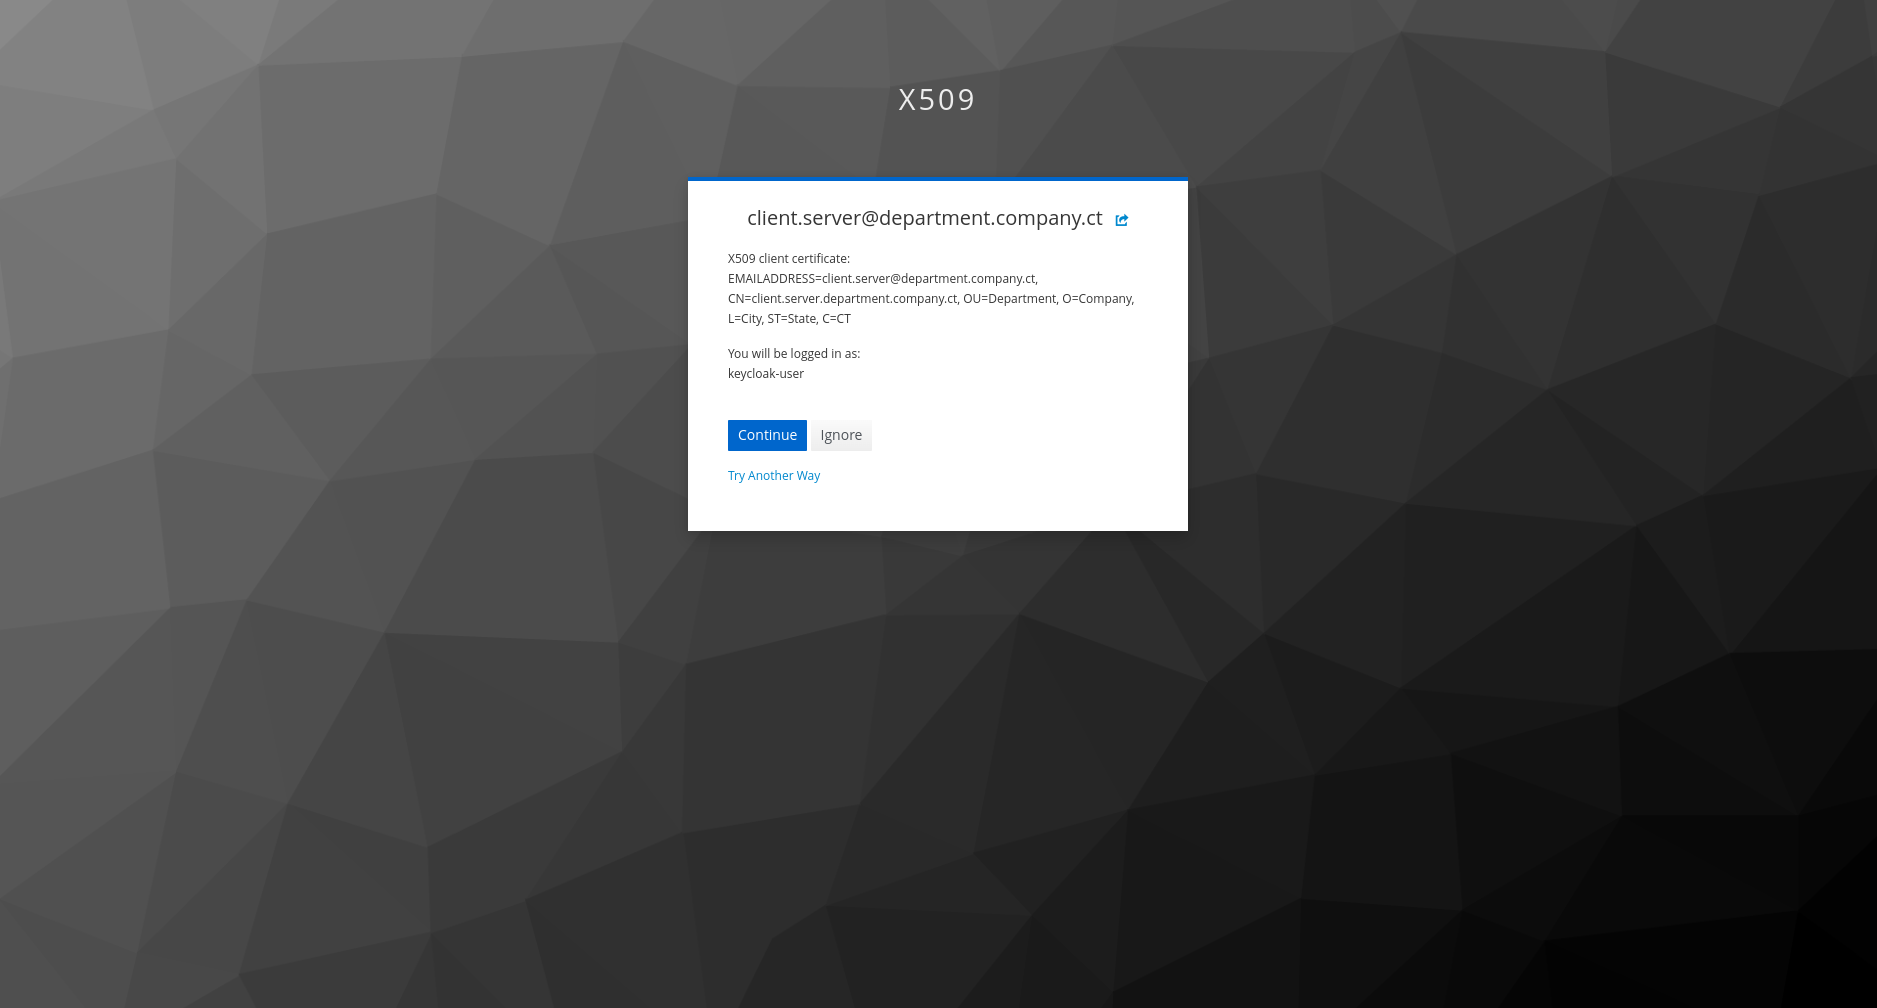
Optionally, you may check the “Bypass identity confirmation” if you want to avoid showing the information screen with the extracted certificate data when the user logs in through the browser (as expected in production services).
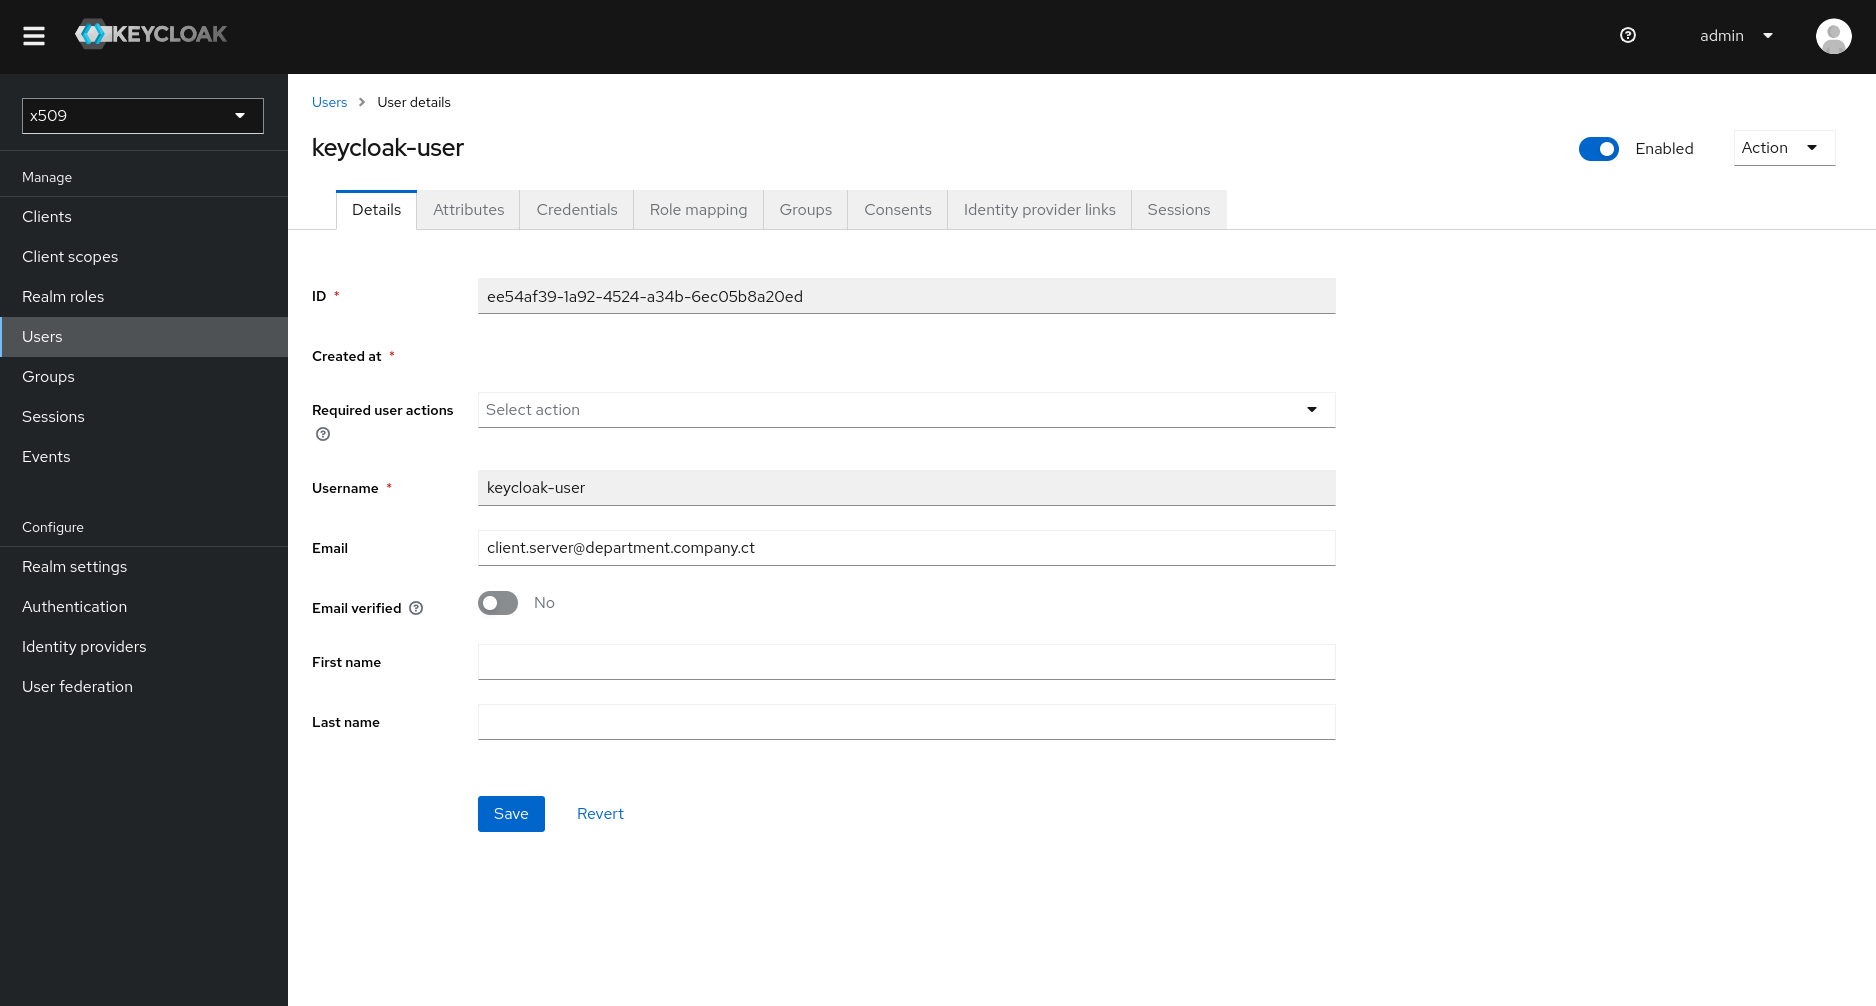
Then create a user named “keycloak-user”, indicating the expected email (taken from the client’s certificate). Fill it as follows:
| Property | Value |
|---|---|
| Username | keycloak-user |
| client.server@department.company.ct |
At this stage, pointing a browser into the expected URL (default: https://server.department.company.ct:8443/admin/master/console/#/x509/clients) will prompt for the certificate, and when selecting it and clicking on “Log in”, you should see the following screen.
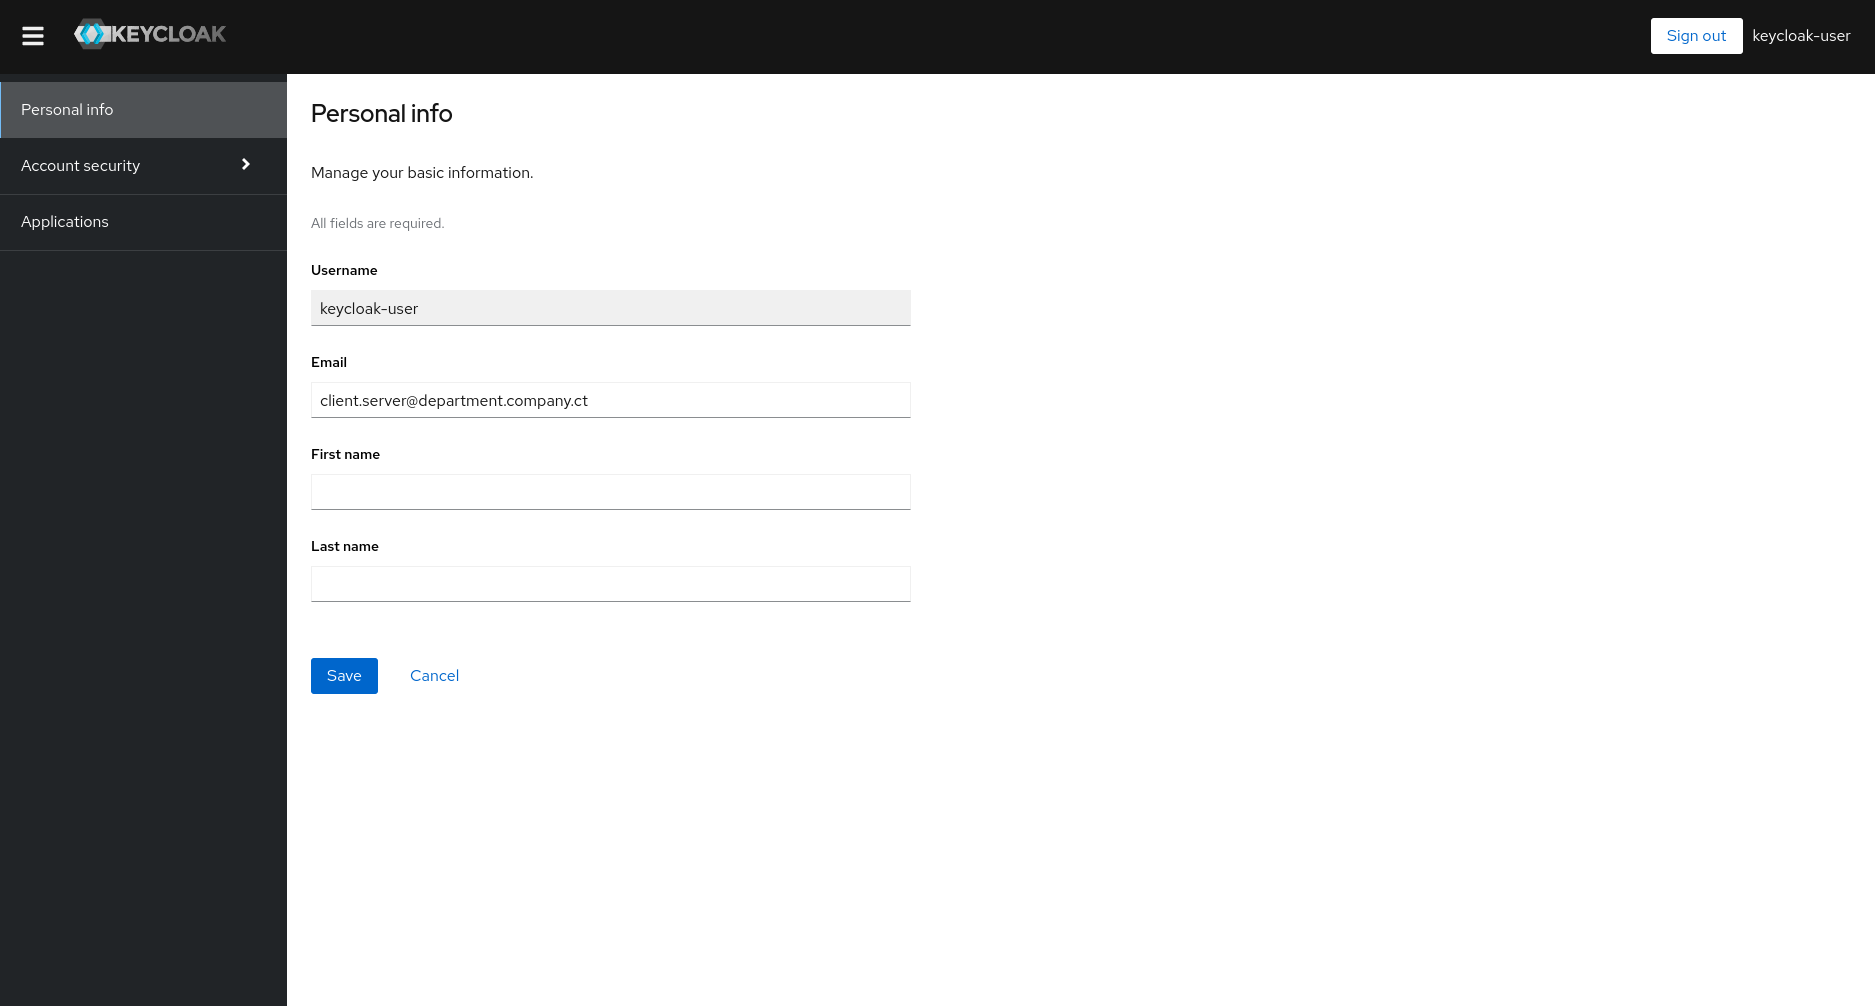
From this point it is possible to reach screens with the user’s details or other information that are restricted to authenticated users.
Method 2: X509-based client authentication
Create a new client with name “keycloak-client”. For authentication flow, pick the default (“Standard flow” and “Direct access grants”) and also select “Service accounts roles” and “OAuth 2.0 Device Authorization Grant”.
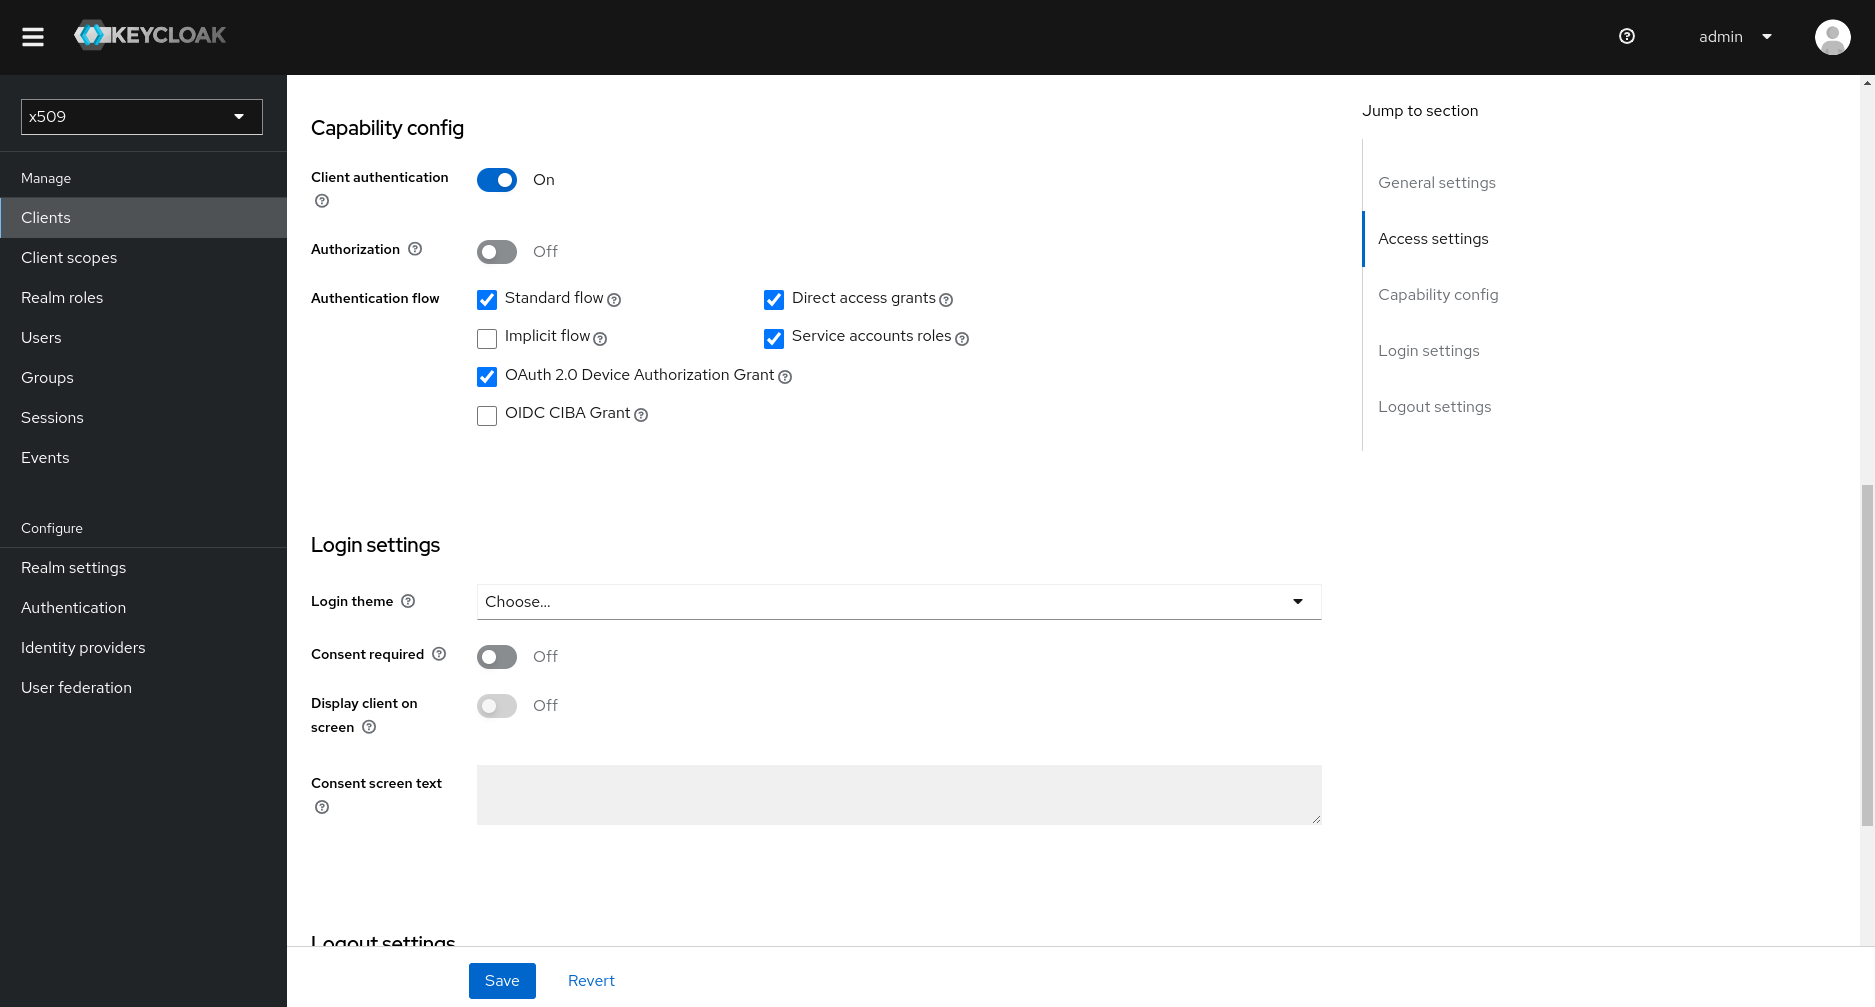
Now, in the “Credentials” tab set the following information:
| Property | Value |
|---|---|
| Client Authenticator | X509 Certificate |
| Allow regex pattern comparison | (On) |
| Subject DN | (.?)CN=(.)client(.).server.department.company.ct(.?)(?:$) |
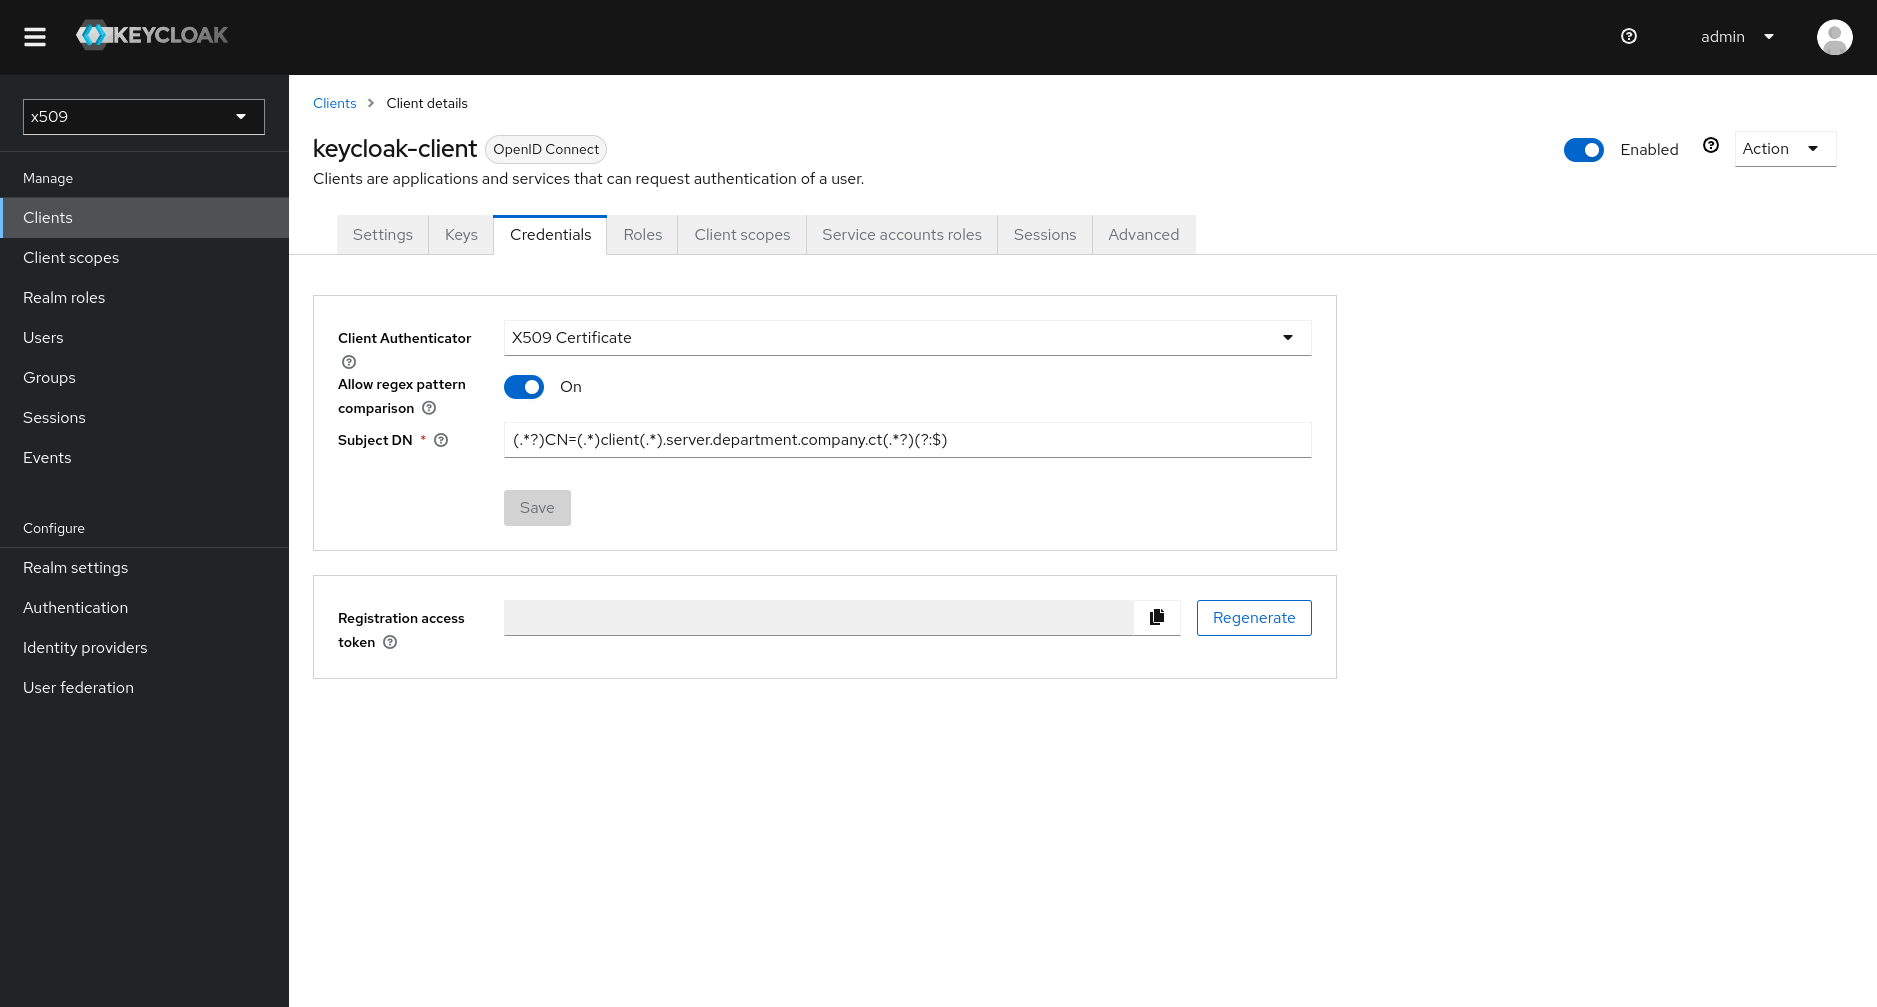
At this point, fetching a token from the terminal (using the client’s certificate and key) should return a JWT access token. A simple test will cURL should yield the token:
1
2
3
4
5
6
7
8
9
10
SERVER_FQDN="server.department.company.ct"
X509_DIR="${PWD}"

curl -ik \
  --location --request POST https://${SERVER_FQDN}:8443/realms/x509/protocol/openid-connect/token \
  --header "Content-Type: application/x-www-form-urlencoded" \
  --data-urlencode "client_id=keycloak-client" \
  --data-urlencode "grant_type=client_credentials" \
  --cert ${X509_DIR}/client.crt \
  --key ${X509_DIR}/client.key
Translated to Python, this would be:
1
2
3
4
5
6
7
8
9
10
11
12
13
14
15
16
17
18
19
20
import requests

client_cert_path = "./x509/client.crt"
client_key_path = "./x509/client.key"
client_id = "keycloak-client"
keycloak_url = "https://server.department.company.ct:8443"
realm_name = "x509"
token_url = f"{keycloak_url}/realms/{realm_name}/protocol/openid-connect/token"

headers = {"Content-Type": "application/x-www-form-urlencoded"}
payload = {"client_id": client_id, "grant_type": "client_credentials"}

data = requests.post(
    url=token_url,
    headers=headers,
    cert=(client_cert_path, client_key_path),
    data=payload,
    verify=False,
)
print(f"Token: {data.json()}")
Furthermore, if using the python-keycloak library you may have noticed that at the time of writing there seems to be no support for mTLS connections for the client flow. In this case, you may tweak it as follows (note that this is tested with python-keyloack==3.7.0 and that this post provides a related approach, but for the validaton of the server’s TLS certificate).
1
2
3
4
5
6
7
8
9
10
11
12
13
14
15
16
17
18
19
20
21
22
23
24
25
26
27
28
29
30
31
32
33
34
35
36
# Disable warnings due to the lack of validation of the TLS certificate
import urllib3
urllib3.disable_warnings(urllib3.exceptions.InsecureRequestWarning)

from keycloak import KeycloakOpenID
from keycloak.urls_patterns import URL_TOKEN

client_cert_path = "./x509/client.crt"
client_key_path = "./x509/client.key"
client_id = "keycloak-client"
keycloak_url = "https://server.department.company.ct:8443"
realm_name = "x509"
token_url = f"{keycloak_url}/realms/{realm_name}/protocol/openid-connect/token"

# Object to be used only for mTLS connections (since its
# connection will be configured in the next command to
# pass both client certificate and key)
keycloak_openid = KeycloakOpenID(
    server_url=keycloak_url,
    realm_name=realm_name,
    client_id=client_id,
    verify=False,
)
keycloak_openid.connection._s.cert = (client_cert_path, client_key_path)

headers = {"Content-Type": "application/x-www-form-urlencoded"}
# Payload can be obtained from src/keycloak/keycloak_openid.py
params_path = {"realm-name": realm_name}
payload = {
    "client_id": keycloak_openid.client_id,
    "grant_type": "client_credentials",
}

data_raw = keycloak_openid.connection.raw_post(URL_TOKEN.format(**params_path), data=payload)
token = data_raw.json()
print(f"Token: {token}")
