When using Atlassian’s Bamboo as your CI/CD pipeline, you may want to integrate the SonarQube analysis to be triggered from the plan; whether in an automatic or manual way as one of the stages in your pipeline. Note that this assumes that the SonarQube plan (e.g., named “project-name”) is already created and configured, and it also expects your project to use Gradle.
This entry will allow you to have a single plan in Bamboo where you can see the analysis for both the base branch (e.g, “master” or “develop”) and the delta difference (and current state) of many other multiple branches (e.g., for features). A case where this is useful are Pull Requests, where the best interest is not to introduce further possible bugs, vulnerabilities, code smells or duplications.
Target
As introduced, and assuming git-flow is in use, the aim is to have a single point where to check:
- The status of temporary branches (e.g., feature tickets being developed)
- The status of your base branch (where all temporary branches are merged to)
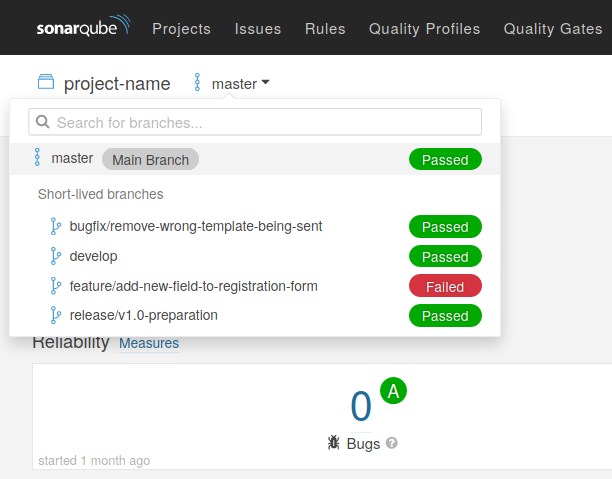
The final output will be a report page with one analysis per branch, laid out like this:
- master (Main Branch)
- Short-lived branches
- bugfix/remove-wrong-template-being-sent
- feature/add-new-field-to-registration-form
Setting up the plugin in Gradle
Add the following to your “build.gradle” file to enable the analysis from SonarQube:
1
2
3
4
5
6
7
8
9
10
11
12
13
14
15
plugins {
    id "org.sonarqube" version "2.6.2"
}
subprojects {
    sonarqube {
        properties {
            property "sonar.sourceEncoding", "UTF-8"
            property "sonar.sources", "src/main"
            property "sonar.tests", "src/test"
            property "sonar.projectVersion", project.version
            property "sonar.log.level", "debug"
            property "sonar.dynamicAnalysis", "reuseReports"
        }
    }
}
Creating the Bamboo stage
The only prerequirement for such a task is to have the code available in the Bamboo agent. If not done before, use a “Source Code Checkout” task to do so. After that, you just need to define a “Sonar Gradle” task.
Inside, you define values such as the “Working subdirectory” and also the “Additional parameters”. It is on the latter ones where you define the specific parameters to pass to Gradle:
1
2
3
4
5
--stacktrace --debug \
-Dsonar.projectBaseDir=${bamboo.build.working.directory} \
-Dsonar.projectKey=project-name -Dsonar.projectName=project-name \
-Dsonar.branch.name=${bamboo.planRepository.branchName} \
-Dsonar.branch.target=develop
That is, you provide the:
- Project base directory: the location of the source code (Bamboo’s build directory, where the agent runs)
- The project key and project name: to be the same as previously defined in SonarQube
- The current branch name: the name of the current branch (automatically obtained by Bamboo’s build plan itself when it is run)
- The target branch name: the name of the base branch where the current branch will be merged against (here, “develop” acts as the “master” branch as this example follows the git-flow methodology)
This stage can be defined to run automatically after a build or you can decide to run it manually, given that it can take a long time depending on the size of your codebase.
Result
Now, when you run this Bamboo stage, it will run the analysis in a given Bamboo agent. After that, results will be communicated to the SonarQube instance and introduced as a new short-lived branch in the project that you defined in your Gradle build parameters.
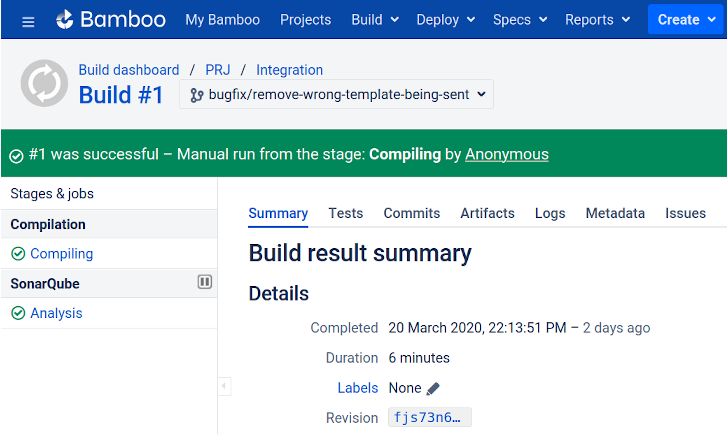
The Bamboo stage will be now visible in the build plan for any given branch:

And the generated SonarQube report(s) will look like this:

